The Route Editor
Overview
You will enter the route editor by clicking the ![]() button on the navigation
page . Additionally you can get to it via the
button on the navigation
page . Additionally you can get to it via the ![]() Edit button in the route's info dialog on the
Files/Download page.
Edit button in the route's info dialog on the
Files/Download page.
Buttons
| Icon | Name | Function |
| ZoomIn | zoom in |
|
| ZoomOut | zoom out |
|
| NavAddAfter | add a new point to the route the chart center (crosshair) will be added after the point that is currently marked red |
|
| NavAdd | add a new point to the route the chart center (crosshair) will be added before the point that is currently marked red |
|
| NavDelete | delete the point that is currently marked red |
|
| NavToCenter | move the currently marked red point to the center of the chart
(crosshair) |
|
| NavGoto | start navigation to the currently marked red point |
|
| StopNav | stop a running navigation (if one is currently active) | |
| Menu | show the EditRoute dialog to create/load/modify/rename a route | |
| NavOverlays | show and hide Overlays | |
| CenterAction | same action as tapping at the map center (crosshair), brings up the Feature List | |
| MOB | man over board(see main page) | |
| Cancel | back to the navigation page |
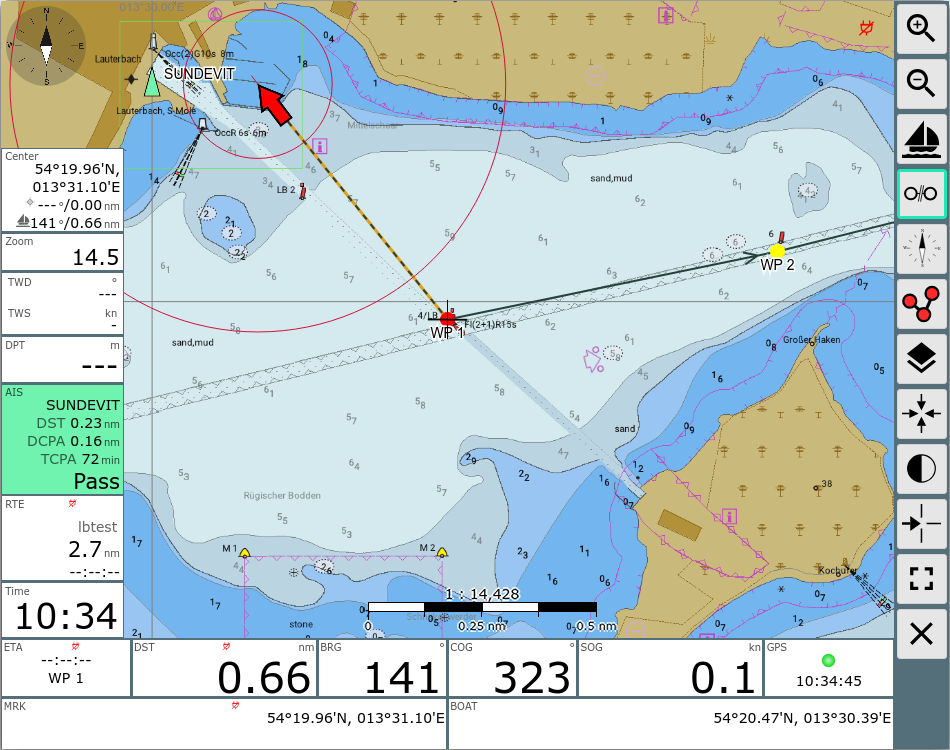
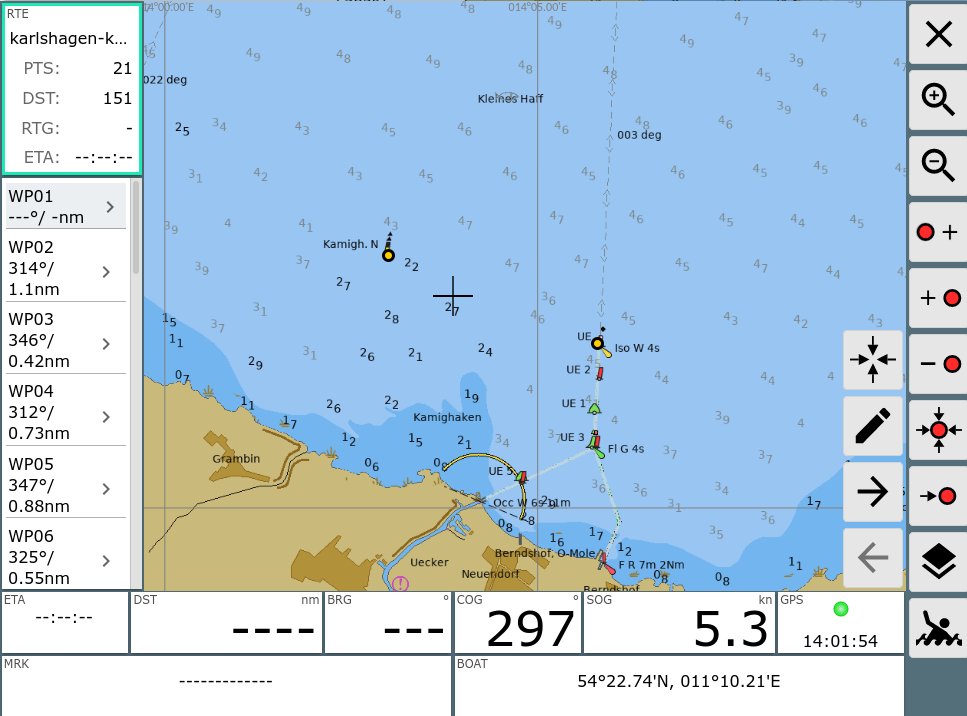
At this page you can create and edit a route.
There is always a currently selected point within the route. It is marked
red on the chart and marked grey in the list on the left side. You can
change the selected point by clicking a different point on the chart or in
the list on the left side.
If you are editing the currently active route, the route info at the left
side will display a red border (otherwise green).
Leaving the editor will take you back to the active route.
All changes become effective immediately - there is no undo.
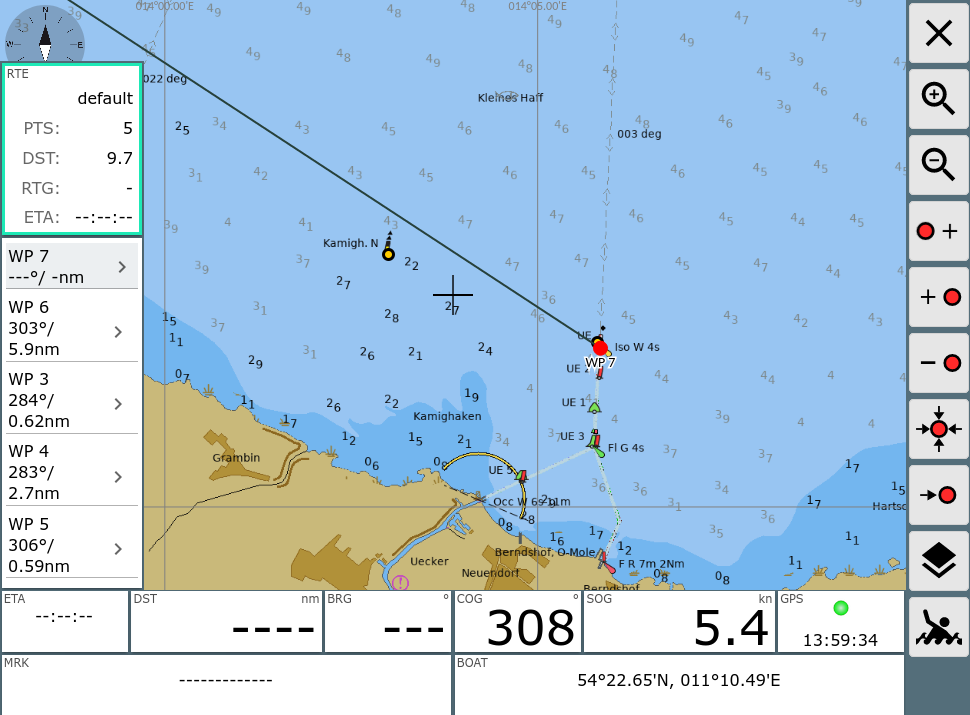
At the left side you see a list of all the route's waypoints including
courses and distances. On top of the list the number of waypoints, the
overall route length and - if the route is active - the estimated ETA are
displayed.
By clicking an already selected waypoint in the list you open an edit
dialog to change its name or position.
EditRoute Dialog
Clicking on the route info on the left side or the ![]() Menu Button opens a dialog.
Menu Button opens a dialog.
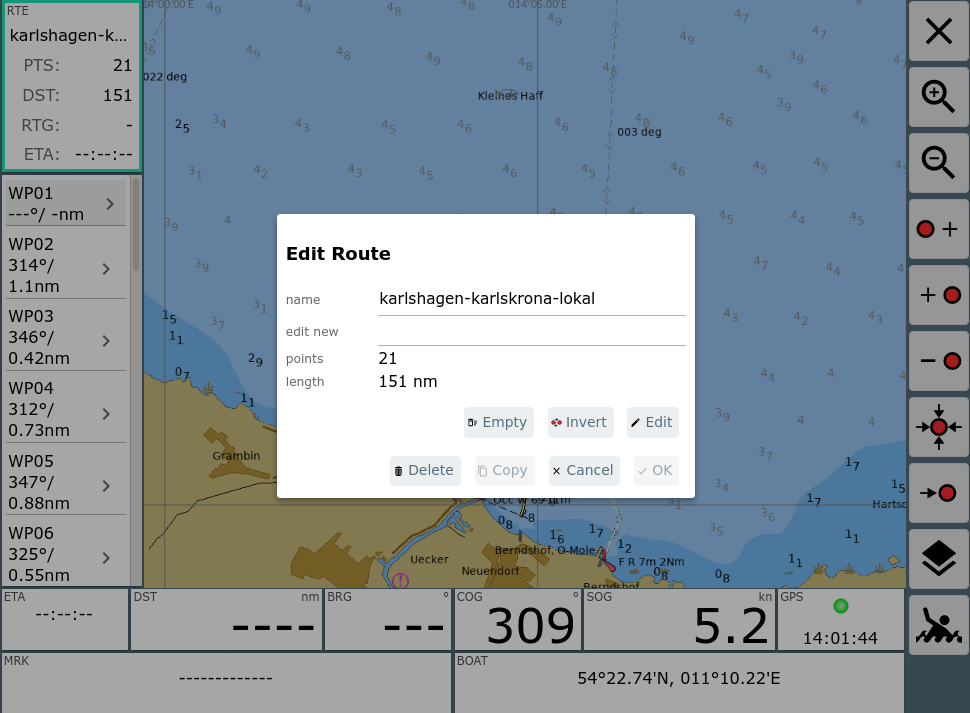
Within this dialog you have the following actions available:
| Action | Description |
| New | Create a new route. You will be prompted for a name. The new route will be empty. |
| Load | Load an existing route. This bring up a select list with the
routes being stored at the server if you are in connected mode
(normal). If in disconnected mode you can load routes being stored
locally. The dialog will also include an Upload button to load a route that you have available locally as a gpx file. It will upload this route to AvNav. |
| Download | Download the current route to store it locally on your device. |
| Rename | Give the route a new name. |
| Points | Open the Points dialog to invert, renumber or empty the list of route points. |
| Delete | Delete the current route from AvNav |
| SaveAs | Save a copy of the current route with a new name. |
| Cancel | Quit the dialog without saving |
| OK | Save your changes |
Name Dialog
From the EditRoute dialog some actions will bring up a name dialog to select a new name for a route.
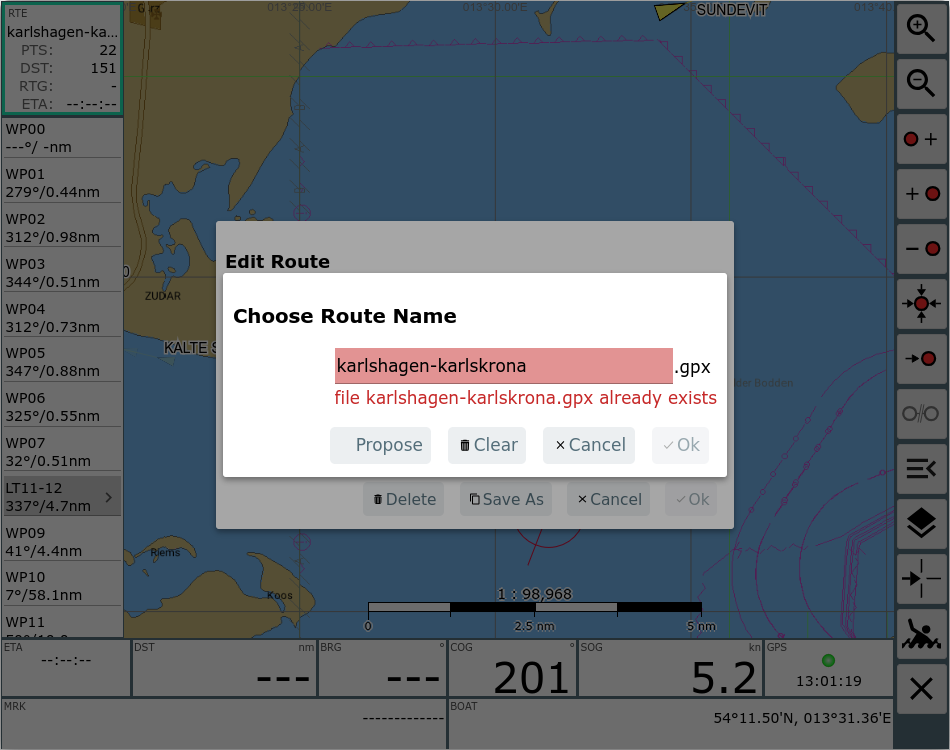
If the selected name already exists you can use the "Propose" action to let the system propose a new name that currently does not exist.
Points Dialog
The "Points" action in the EditRoute dialog will bring up the Points dialog.
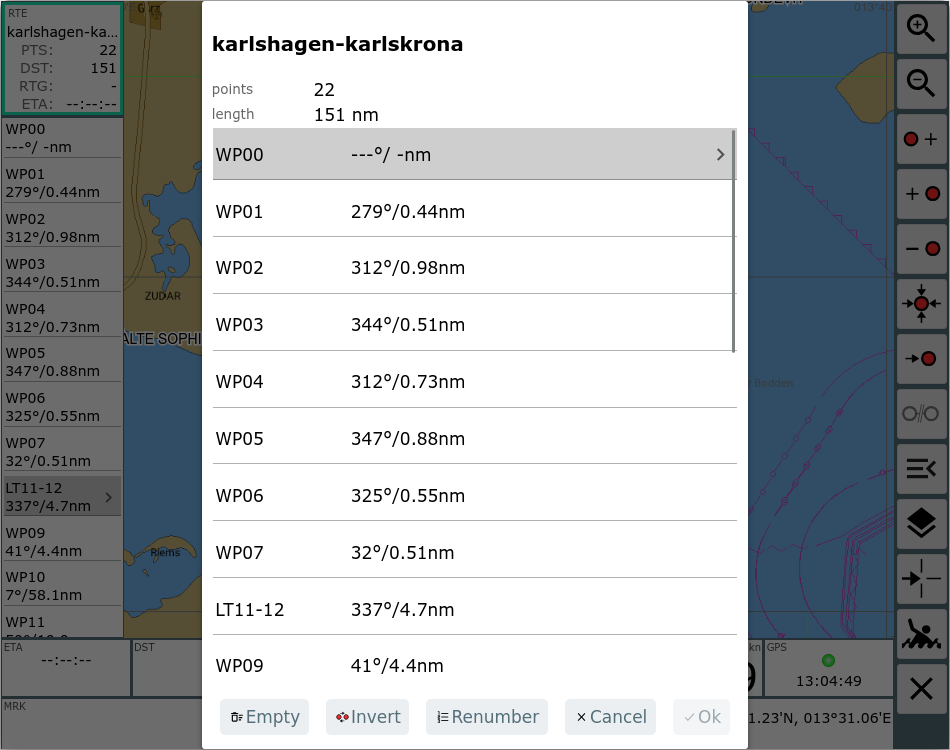
You can empty, invert or renumber the list of points. By clicking on a point in the list a dialog will be brought up to edit this point (e.g. changing the name).
Route Point Buttons
Clicking the bottom left panel activates some additional buttons.
Using those buttons you can move between the points in the route or you
can edit the selected waypoint.
Clicking the bottom right panel centers the chart at the boat's position.
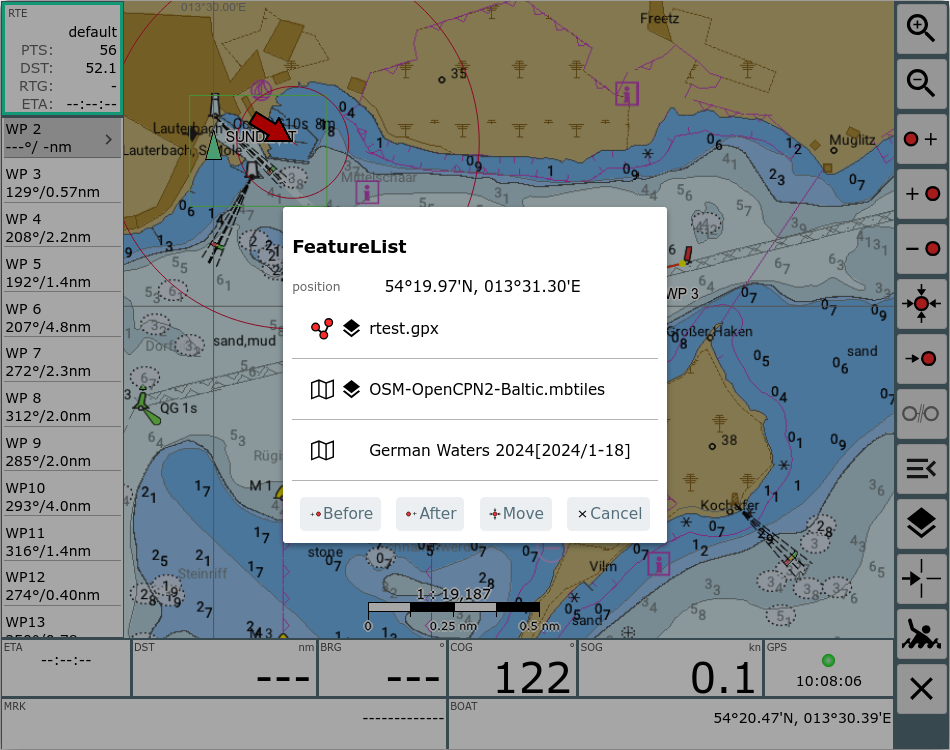
Using the Feature Info
When you tap on the map or click the ![]() CenterAction button you will get the list of
features at this point.
CenterAction button you will get the list of
features at this point.
You will get some additional actions for using it in editing the route:
| Action | Description |
| Before | Insert the point that you clicked before the currently selected (red) route point |
| After | Insert the point that you clicked after the currently selected (red) route point |
| Move | Move the currently selected (red) route point to the point that you clicked |
| Cancel | Close the list |
Using this dialog you can add points to the route by clicking on the map and using Before/After.
If there is a route in the list and you click on it you get more dedicated actions.
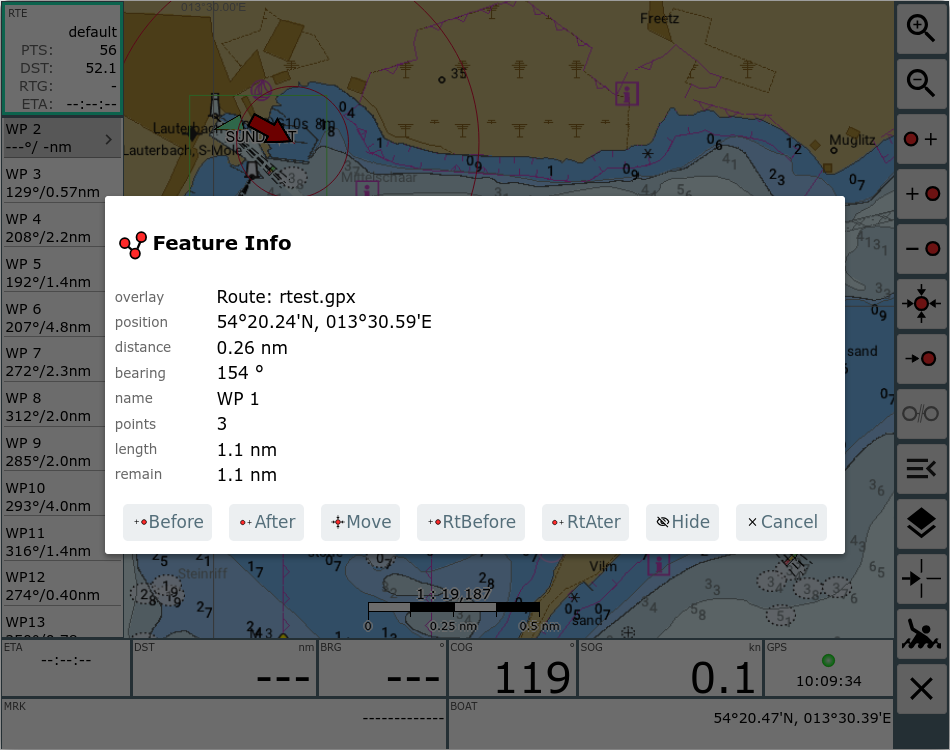
The info shows the nearest point of the overlay route and offers a couple of actions:
| Action | Description |
| Before | Insert the shown point from the overlay route before your currently selected (red) route point |
| After | Insert the shown point from the overlay route after your currently selected (red) route point |
| RtBefore | Insert the complete overlay route starting at the shown point before your currently selected (red) route point |
| RtAfter | Insert the complete overlay route starting at the shown point after your currently selected (red) route point |
| Hide | Hide the overlay route |
| Cancel | Close the dialog |
Using this Feature Info you could create routes that contain your
favorite way points, add them as overlay and use them to insert way points
into routes that you create.
Hint: To only display the points of a route just set the line width of the
overlay to 0.
Connected and Disconnected Mode
If you switch off the ![]() ConnectedMode on the mainpage
(showing a
ConnectedMode on the mainpage
(showing a ![]() disconnect icon in the title) this basically
means you cannot change items that are stored on the server. This also
includes routes. You still can create new routes or modify routes that you
created while being disconnected.
disconnect icon in the title) this basically
means you cannot change items that are stored on the server. This also
includes routes. You still can create new routes or modify routes that you
created while being disconnected.
The intention is to give you the option to play with alternative routes
(including activating them) without interfering with the server.
When you leave the disconnected mode and a (different) route is active on
the server this will also become locally.
The EditRoute dialog will show you the
information whether a route is stored on the server and if you currently
can write the route.
If you try to edit a route that is stored on the server while in
disconnected mode you will get a warning.

In this case just click "OK" (will bring up the EditRoute
dialog) and e.g. create a copy using "Save As".
By default the "Load" action in the EditRoute dialog will only provide you
the list of routes you currently can write (but you could also load a read
only route to display it).
When you created a route in disconnected mode it will be stored locally in your Browser. To copy it to the server return to connected mode, open the local route in the route editor and make a change - this will automatically push the route to the server.
If you start a route in disconnected mode small ![]() disconnect icons will be shown in various
widgets. The content of those widgets in this case is only valid for your
local display and e.g. does not affect the NMEA data (like RMB/APB) that
the server will send.
disconnect icons will be shown in various
widgets. The content of those widgets in this case is only valid for your
local display and e.g. does not affect the NMEA data (like RMB/APB) that
the server will send.