The Navigation Page
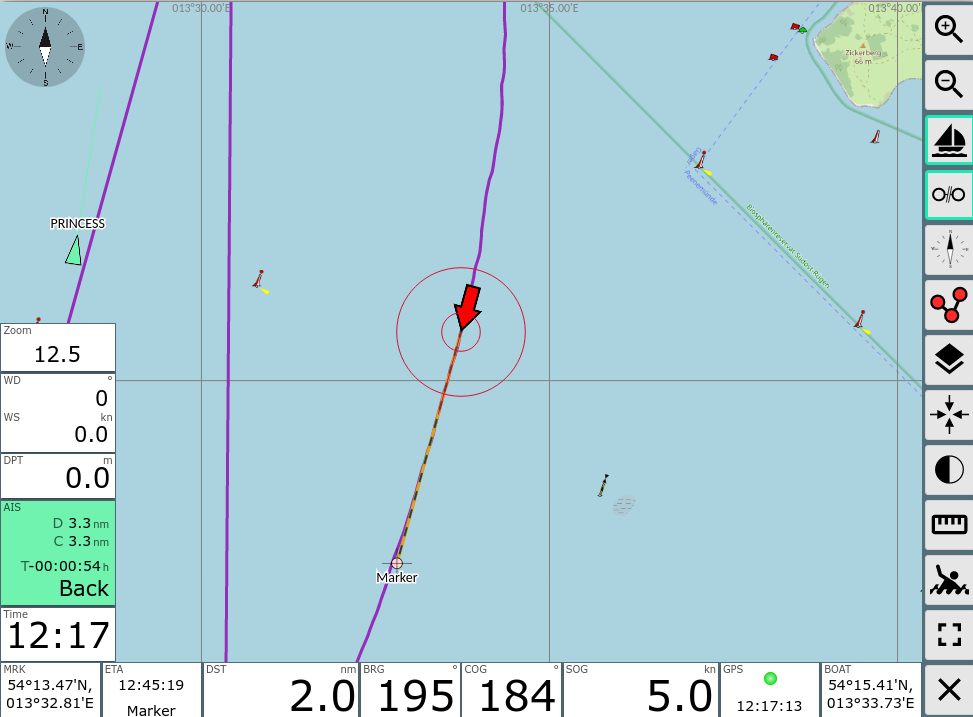
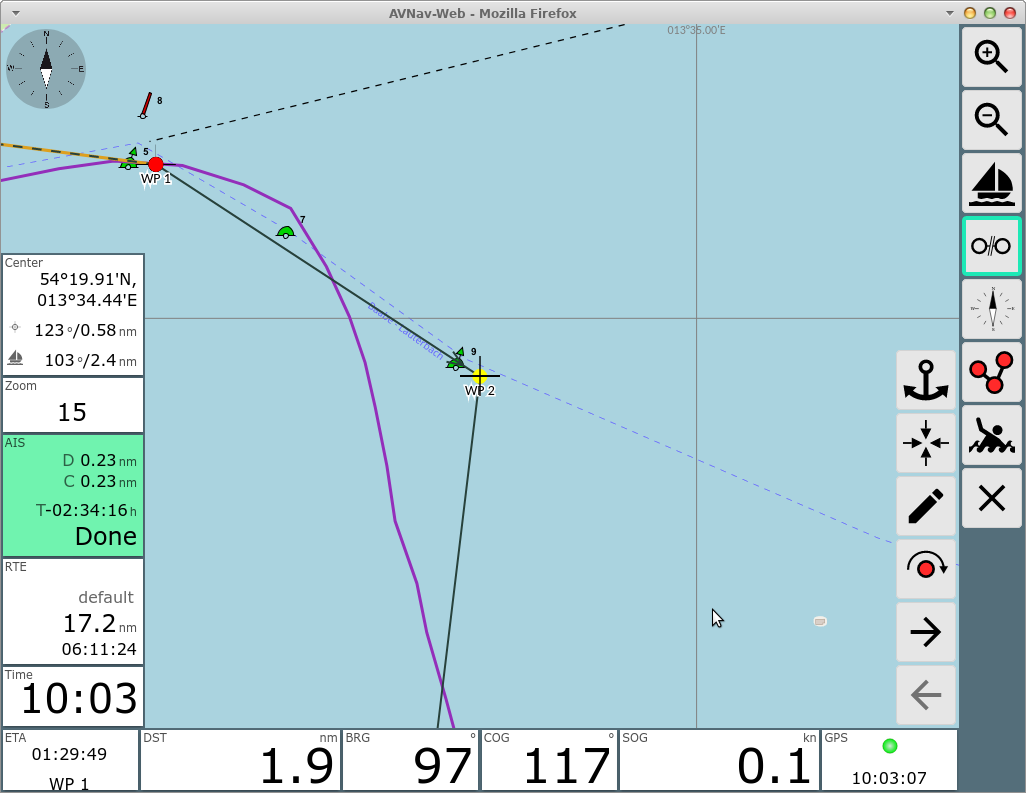
This page is the one normally used for navigation. In the screenshot an active waypoint is shown and the chart is locked to the boat position (i.e. will move with the boat).
| Icon | Name | Function |
| ZoomIn | Zoom in | |
| ZoomOut |
Zoom out |
|
| LockPos |
lock the chart center to the boat position can only be activated if there is a valid position |
|
| StopNav |
stop the navigation only visible if a waypoint or route is active |
|
| LockMarker |
start waypoint navigation. the center of the chart (crosshair) will become the target waypoint. only visible if there is no active route or waypoint |
|
| CourseUp |
rotate chart - course forward will be at top |
|
| ShowRoutePanel |
switch to route editor (also by
clicking on the route display if there is any) |
|
| MOB |
man over board (see main page) |
|
| FullScreen | Fullscreen on/off (supported browsers only) | |
| CenterAction | Same action as tapping on the map at the center (cross hair). Will bring up the FeatureList at this point. | |
| Overflow |
Display a second button list if the screen is too small to fit all
buttons. Only visible if you did not select "2 button columns" at
Settings/Layout. |
|
| NavOverlays | Activate or Deactivate Overlays | |
| Night | Activate/Deactivate of the night mode (since 20210619, if Settings/Buttons/night mode on navpage is enabled) | |
| GpsCenter | Center map to boat position (since 20210619) | |
| Dim |
Dim Mode. The screen will be dimmed and all buttons become
inactive. Leave this state by clicking anywhere on the screen. This button is only visible in the Android app or when using the BonjourBrowser (version 1.5 and above). This button really dims the complete screen. This way you can limit the power consumption of your device if you do not need an instant display. It can also prevent overheating when running on high brightness and on high temperatures. |
|
| RemoteChannel | selection of the remote control channel and mode (send/receive). | |
| Cancel | back to main page |
This is the navigation view. In the middle there is the chart display with the boat position (red arrow). The yellow and green symbols are the AIS targets in vicinity (10nm, can be changed in settings) together with their current course as well as name or MMSI. The orange line indicates the course towards the current target waypoint. The dotted line show the original course from the start of navigation to the target waypoint. You can move and zoom the chart with the normal gestures. For zooming you can also use the buttons +/- on the right side.
You can have up to 3 Navigation Circles being drawn around the boat to be able to estimate distances. You can change them via settings->navigation display. Standard values are 300m and 1000m.
(since 202011xx) The length of the line indicating your current course ("Course Vector") can be adapted in the settings (Navigation/Boat Course Vector Length). You will set the seconds and the length will be computed using your current boat speed (default: 10 minutes). The width of this line is controlled by the width for the Navigation Circles.
The same settings also apply to the course vectors of AIS targets.
For the boat direction and the course vectors you can select various modes (since 20220421) - you can choose at settings->navigation->boat direction (see the GitHub discussion):
| Setting | Meaning | Symbol-Name |
| cog | boat direction and course vector COG | boatImage (arrow) |
| hdt | boat direction based on Heading True (fallback to COG if not available), course vector based on COG. Optionally HDT as dotted line(settings->navigation->add dashed vector for hdt/hdm) | boatImageHdg (Boat) |
| hdm | boat direction based on Heading Magnetic (fallback to COG if not available), course vector based on COG. Optional HDM as dotted line(settings->navigation->add dashed vector for hdt/hdm) | boatImageHdg (Boat) |
In the settings you can additionally activate a "no boat movement" detection.(settings->navigation->zero SOG detect). If this is activated and the boat speed (SOG) drops below 0.2 kn (settings->navigation->zero SOG detect below (kn)) the boat symbol will change to a red circle (boatImageSteady).
Lock Mode
If the chart is locked to the boat position (like in the picture) it will always keep the boat in the center of the screen and move the map accordingly.
Since version 20230614 you can allow (settings/Map "allow move when locked") to move the map when locked.When you finish moving the map the boat will be held at the current position on the screen.
But it will be ensured that the boat at least is visible.
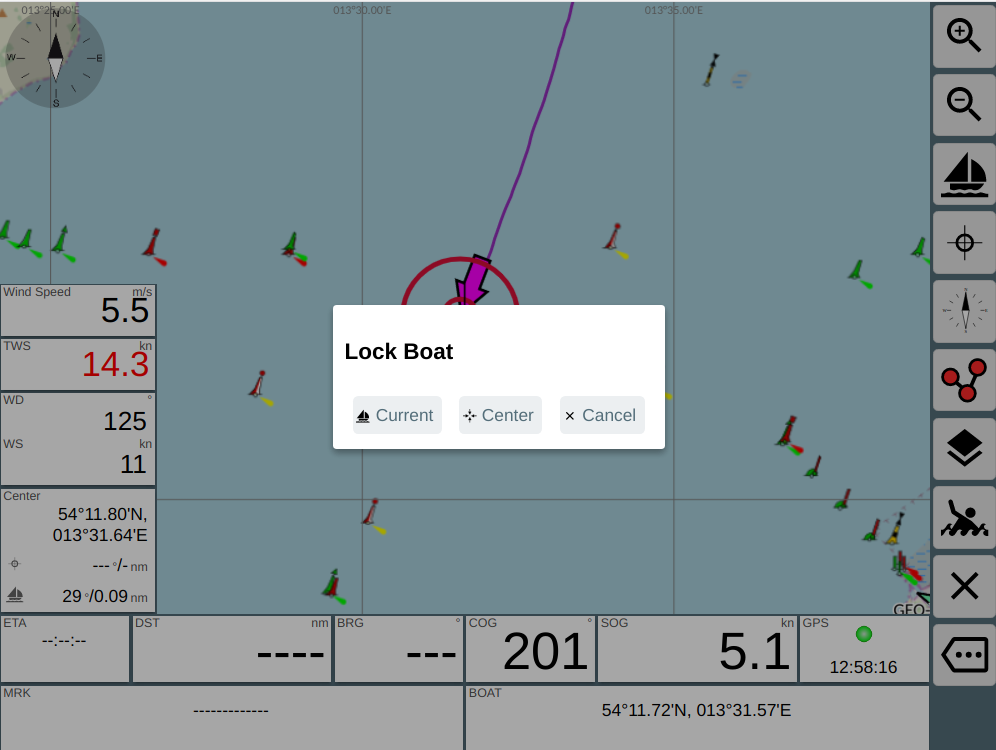
Since version 20210619 you can lock the boat position to any place on the screen even initially. You need to set (Settings/Map/boat lock mode) either "current" or "ask" .
With "current" you will keep the boat at the point at the screen where it
is when you "lock".
With "ask" there will be a dialog at every "Lock" :
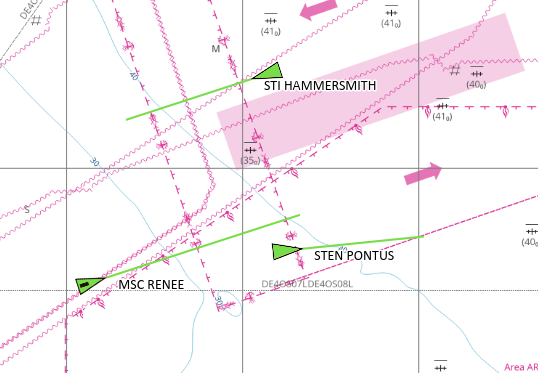
AIS Target Display
AvNav shows AIS Targets up to a configured distance to the current vessel
posiion.
The display includes some information about the target (configure it at
the settings page, AIS) and some motion
vectors that show the movement of the AIS target.
AIS target symbols can be replaced by user defined symbols - optionally different ones depending on the AIS shiptype. For the own boat and optionally for each AIS target a course vector points to the position to be reached within a defined time interval (default: 10 minutes).
Since 20230614 AIS atons will also be displayed (you need to have settings/AIS
"only show moving targets" switched off and "show other" switched on). For
each AIS target you can display an estimated position depending on the age
of the received information, course and speed (settings/AIS "show
estimated position").
You can select if an AIS target should be rotated by its HDG (if received
- settings/AIS "use heading for direction") - otherwise COG will be used.
The course vector of an AIS target will always be rotated by COG.
There are different symbols for AIS targets - for details refer to "user
defined icons".
If you enable this in the setting the targets will also show an estimated
position (shadow) based on the age of the AIS information.
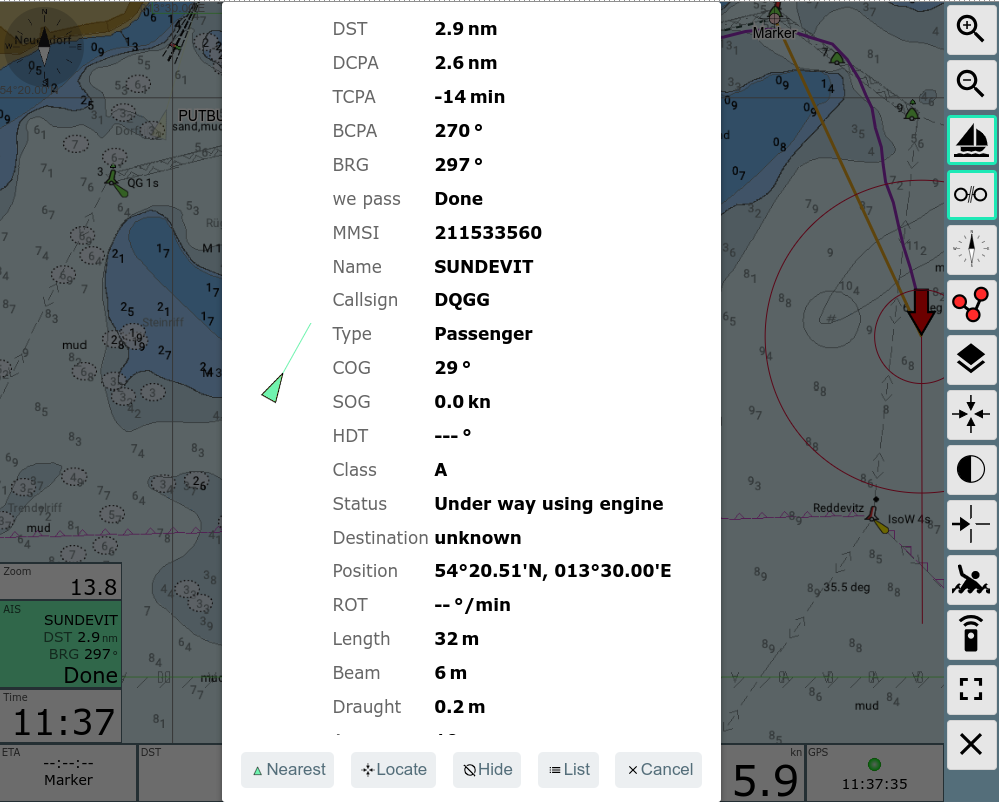
By clicking an AIS target (or the "next AIS" display) you will be shown all information for this target and you can change to the list of all AIS targets.
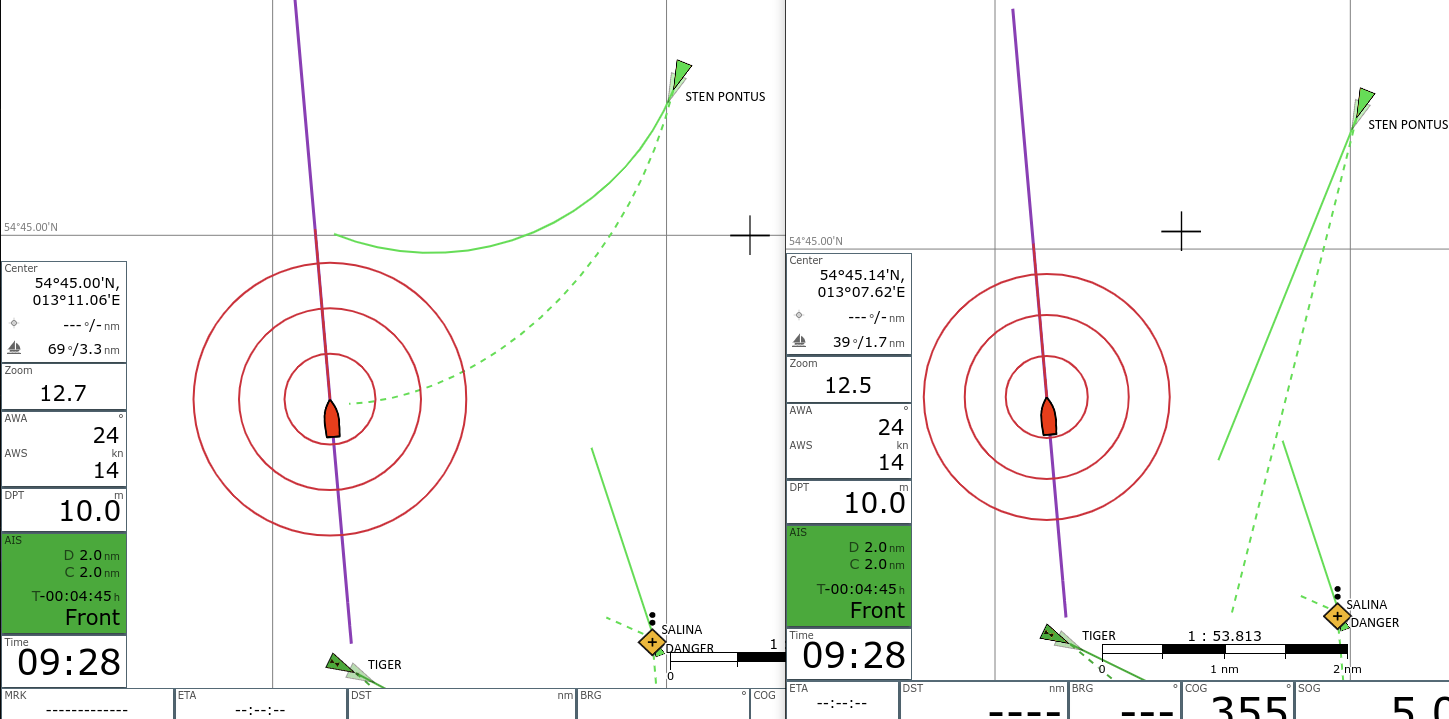
AIS Motion Vectors
A basic introduction to the topic of true and relative motion vectors and how they are used in navigation can be found at
True motion vectors
AvNav displays the estimated track over ground for AIS targets if settings->AIS->use-course-vector is activated. A line is drawn from the last known position of the target in the direction of the course over ground (COG) of the target with the length of the course over ground (SOG) multiplied by boat-course-vector-length. This line is the so-called true motion vector, or TMV for short.
Relative motion vectors (since 20240520)
In addition, relative motion vectors can be displayed in AvNav. To enable this, set a value greater than zero in settings->AIS->relative-motion-vector-range, then RMVs are also displayed as dashed lines for targets that are within this distance.
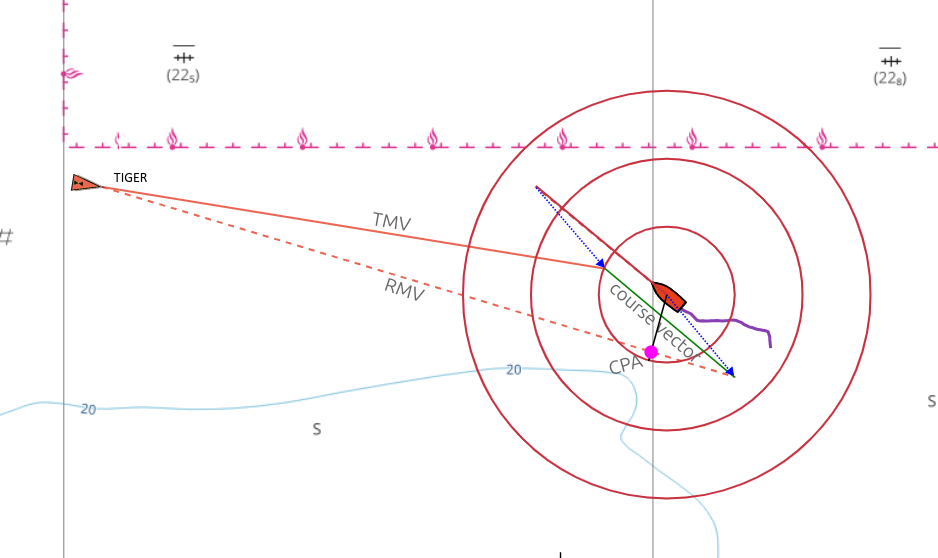
The RMV shows the movement of the target relative to the own ship, it results as the difference between TMV and the own course vector, so that TMV, RMV and the own course vector form a triangle. If the RMV of a target points directly at your own ship, there is a risk of collision. The position of the CPA can also be read directly from the RMV; the crossing of a line perpendicular to the RMV going through your own ship with the RMV.
The RMVs correspond to the tracks that the targets would leave on a radar screen.
Curved vectors (since 20240520)
If you activate settings->AIS->curved-vectors, a rate-of-turn (ROT) present in the AIS data is evaluated and the rotation of the target is taken into account when displaying the vectors. The TMVs and RMVs are then displayed as curved lines. The curved vectors may indicate a potential collision much earlier than the uncurved vectors.
CPA and Motion Vector Computations
To compute the CPA data and the motion vectors AvNav considers the received data of an AIS target (position, COG, SOG) and the data of the own boat (position, COG, SOG).
Before version 20250723 the computation uses the AIS target data as shown on the map and the boat data as shown when this data is computed.
AvNav computes:
- the point where both tracks cross (our track and the target's track, ground tracks)
- the point, where both (we and target) reach minimum distance to each other, the CPA
It also computes the times needed to reach these points. Negative times
mean, that the point has already been passed.
Derived from this data we decide how we pass the target:
- front = we will cross track of target in front of target
- back = we will cross track of target astern of target
- pass = we have crossed the track of the target already or crossing point could not be calculated (stationary target)
- done = we have crossed the track and have passed CPA
Based on the computed DCPA (minimal distance at the CPA point) and TCPA (time to reach this point) AvNav sets a warning flag at the target if the values are below the configured threshold.
Priority
To select which target is shown in the AisTargetWidget and for sorting
items in the ais list AvNav computes a
priority for each target.
The priority (from high to low):
- Targets with warning (i.e. CPA < warning CPA and TCPA < warning
TCPA but > 0)
They are sorted by the TCPA with lowest TCPA being on top - other targets sorted by lowest (dx)²+(dy)² .
For TCPA < 0 (CPA already passed) dx=dy=distance/warningDistance.
For TCPA >= 0 dx=tcpa/warningTime, dy=cpa/warningDistance
This way the targets should be sorted by their importance.
The originally (before 20250723) used computation approach has some drawbacks:
The AIS target normally moves and AIS messages are only received at certain time intervals. Moreover the AvNav viewer part (in the browser) only fetches the AIS data every nn seconds (settings/UpdateTimes/AIS - default 5 seconds). So the AIS symbol on the map is drawn at a position it already had some time in the past. And the same way the computation will give results that are not completely correct - it uses the boat position/course/speed at the time of computation and the AIS position/course/speed from a time when the AIS message has been sent by the target.
If you have a "classic" situation with some AIS target that you will approach in the near future you will observe a constant change in the computed CPA (and motion vector) data - even if the target keeps course/speed and your vessel also keeps course and speed.
Starting from version 20250723 AvNav will give you the option (activated by default, settings/AIS/CPA from estimated) to compute the CPA and motion vector data from an estimated position of the AIS target. This position is the same as the one drawn on the map as a "shadow". The estimation simply assumes that the AIS target keeps course (COG) and speed over time and considers the age of the ais information.
This age is computed by considering:
- The time the AIS message has spent in the AvNav server from receiving it till the viewer (the browser) fetches the data. If the data is received by SignalK it also considers the time it already has spent in SignalK.
- The time from receiving it in the browser till the computation (could at most be the AIS update time - settings/UpdateTimes/AIS - 5s).
By using this computation you will normally get a constant CPA if your course/speed and the AIS target course/speed remain constant. So in most situation this could give you a better result.
But there are still 2 problems that cannot be addressed with this computation:
- If the computation of the time between receiving the AIS message and sending it to the browser is wrong (e.g. missing time sync between SignalK and AvNav) you will always get wrong results. Potentially you will not really notice this if the difference remains the same over time.
- If the AIS target changes course/speed the estimated position is
wrong. This normally should only be an intermediate problem that will go
away once course and speed are stable again.
In principle we could also consider the ROT (rate of turn) of a target - but the ROT to be constant over longer time most probably is not very likely - so this is not used to compute the estimated position.
As both computations have their limits AvNav leaves the decision to the user - defaulting to use the estimated position.
Starting from 20250723 all AIS computations are done in the browser in a separate thread (worker) and will be repeated each time the boat position changes or new AIS data is fetched from the server. In versions before most computations have only been executed when fetching new AIS data.
Displays (Widgets)
At the left side you have (top down):- current chart zoom, preferred zoom factor in brackets if auto zoom activated
- the closest AIS target (green), turning red on AIS warning or the selected AIS target (yellow)
- current time
The display of the closest AIS target will turn red if expected CPA is closer than 500m (can be changed in settings). If the display is yellow it does not show the nearest target but a different one selected on the ais info. If you click on this display you move to the ais info page.
(since 202011xx) The icons used for your boat and the AIS targets can be changed using a file images.json. Additionally you can scale the AIS symbols (AIS/Icon Scale) and you can define a border(AIS/Border Width). You can also switch off AIS/AIS Use Course Vector, if your browser is too much slowed down by the computation and drawing of the AIS course vectors.
The most important instrument data are shown at the bottom of the navigation page. At the left, data for currently active waypoint (if any) are displayed
- Position
- ETA
- Bearing
- Distance (nm)
On the right the boat data:
- Course
- SOG (kn)
- Position
- local time from GPS
- GPS indicator: green - gps data ok, red: no gps data
Depending on display width and font size setting (widget font size) you will have 2 rows of data (you can change this in settings at "2 widget rows"). Items that do not fit anymore will be hidden completely.
You can set up averaging (settings->navigation) for the boat data (position, course, speed). If turned on the captions at the displays will turn red.
All data displays can be adapted with the layout editor.
If you click on the lower right displays you will be taken to the dashboard.
Clicking on the lower left displays will bring up a couple of additional waypoint buttons, depending on waypoint or route being active. If neither applies, just the AnchorWatch button will be shown.
Waypoint Buttons
| Icon | Name | Function |
| AnchorWatch | switch on anchor watch (see dashboard) | |
| WpLocate | move chart center to waypoint | |
| WpEdit | edit waypoint you can change the waypoint's name and position in the dialog |
|
| NavRestart | restart navigation to the current waypoint. This especially sets a
new course and restarts the XTE computation. Will only be visible if a navigation is active currently. |
If a route is active, the waypoint buttons will change slightly.
The additional buttons
| Icon | Name | Function |
| NavNext | start navigation to the next waypoint of the current route | |
| WpNext | center chart to next waypoint | |
| WpPrevious | center chart to previous waypoint | |
| WpGoto | If you selected a point in the route (with the |
|
| NavRestart | restart navigation to the current waypoint. This especially sets a
new course and restarts the XTE computation. Will only be visible if a navigation is active currently. |
Route Info
If a route is active there will be a display for the route data on the left side (name, remaining distance, ETA).
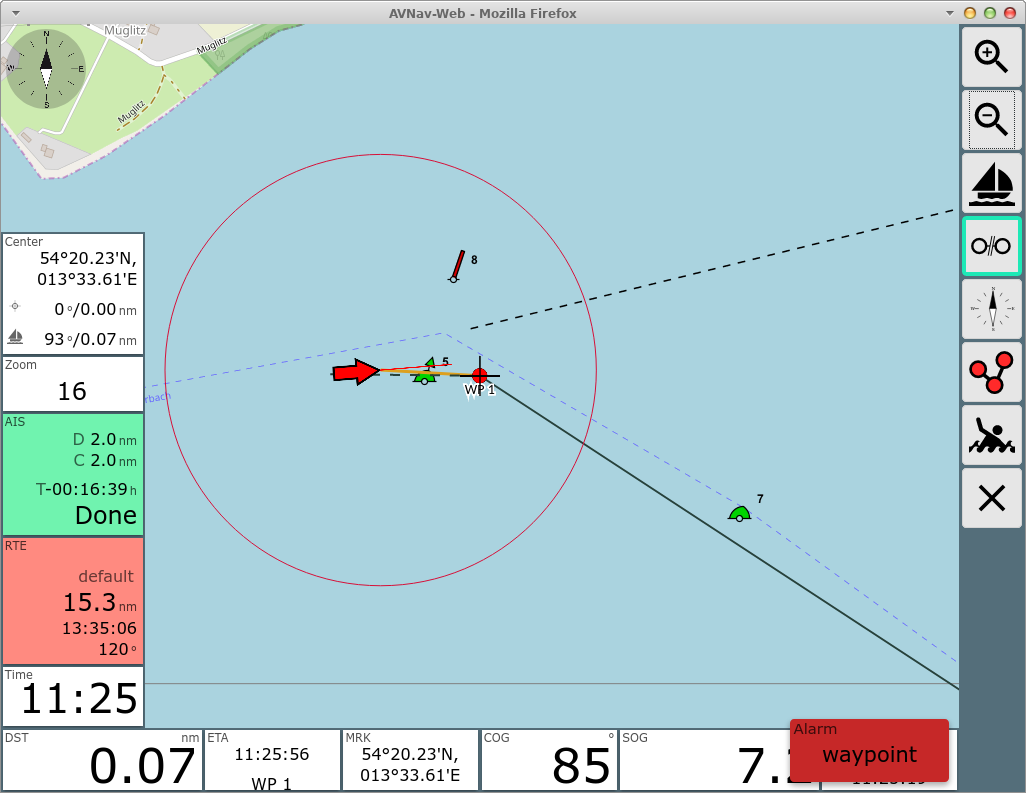
In routing mode the next target waypoint will be activated automatically if the following conditions are met:
- the boat is within the approach radius to the current target waypoint (default 200m - settings->route->approach)
- the second condition depending on the selected mode is met (early/90/late) - see Next Waypoint Handling
In approach to the waypoint the display of the route parameters will turn red and the course to the next waypoint will be shown additionally. Additionally a waypoint alarm is triggered.
If next waypoint is not activated automatically (e.g. because you are too
far), you can click on the waypoint data and use the ![]() button to set the next waypoint as target.
button to set the next waypoint as target.
Feature Info
When you click on the map (and have settings/map/Feature Info on Click enabled) - or you click the CenterAction button you will bring up a dialog showing you the available features at this position. Features can be:
- AIS Targets
- a current route
- the current track
- the current measure line
- the boat
- any overlay
- the current chart

This dialog will allow you to immediately start a simple way point navigation ("Goto") or to create a new route using the selected point as starting point.
Clicking on any of the items will bring up a second dialog with more detailed information and additional actions.
AIS Items
The AIS info will show you the details about an AIS target. It provides the following actions:
| Name | Action | |
| AisNearest | Go back to the normal AIS function showing the nearest (highest priority) target in the AisTargetWidget | |
| AisInfoLocate | Make the selected target the one we follow (i.e. show in the AisTargetWidget) and center the map to it | |
| AisInfoHide | Hide the selected target temporarily (settings/ais/hide time) | |
| AisInfoList | show the ais list page | |
| Cancel | Close the dialog |
Vector Charts

If there is an important chart item (buoy or light) being selected a top level info is shown. You get a couple of additional actions.
Current Track

If we tapped near the current track and it is included in the Feature
List we can get the feature info for it.
The available actions:
| Name | Action | |
| goto | Start a waypoint navigation to the position denoted in the track's Feature Info. This slightly differs from the "Goto" in the feature list as the latter targets the position clicked on the map. | |
| center | Center the map to the closest point of the track | |
| toroute | Convert the current track into a route (see Tracks to Routes) | |
| Delete | Clean the current track. This will rename the current track file to a file with a suffix (like from 2025-07-03.gpx to 2025-07-03-1.gpx). It will potentially also rename files from the day before (depending on the length of the track). Track writing afterwards continues as normal - but the history is removed from the display. | |
| Cancel | Close the dialog |
Current Route
If we tap near a point from the current route we will get it in the feature list. By clicking on it we get a route feature info dialog.

| Name | Action | |
| goto | Start a waypoint navigation to the position denoted in the route's Feature Info. This slightly differs from the "Goto" in the feature list as the latter targets the position clicked on the map. | |
| center | Center the map to the selected point in the route | |
| editRoute | Open the route editor with the current route | |
| Cancel | Close the dialog |
Measure
When tapping on the map or using the ![]() CenterAction button you will be able to
start/extend a measure function. This is only available if the map is not
locked to the boat position.
CenterAction button you will be able to
start/extend a measure function. This is only available if the map is not
locked to the boat position.

By clicking the "Measure" button you will get an icon (see usericons) at the start position and a line with direction and distance to the current map center. The Center Widget will also display the measure information.

By tapping the ![]() CenterAction button again (or tapping on the map)
you will get action buttons to end the measure or to extend the measure.
You can also end the measure by clicking the small red measure icon in
upper right of the map.
CenterAction button again (or tapping on the map)
you will get action buttons to end the measure or to extend the measure.
You can also end the measure by clicking the small red measure icon in
upper right of the map.

Actions:
| Name | Action | |
| Measure | +Measure: Add the current center/tapped point to the existing measure. The measure display will sum up the distances. | |
| MeasureOff | End the active measure |
If there is an active measure and you click the measure row in the feature list you will get an option to convert the measure into a route.

Special Functions
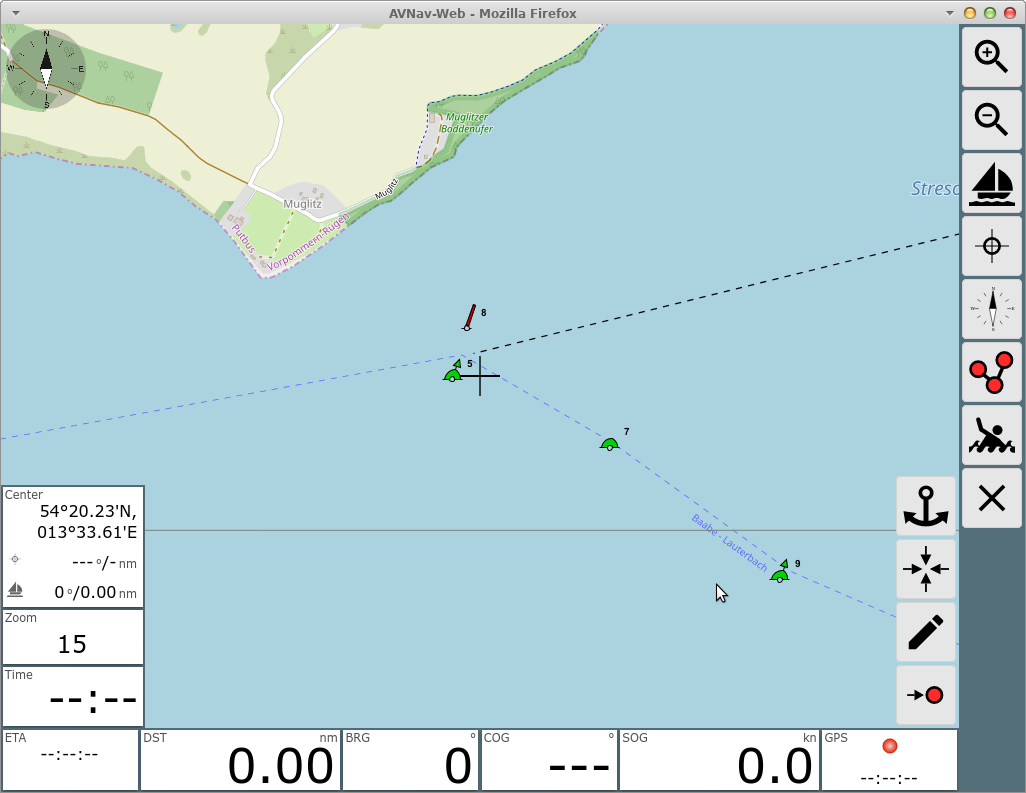
Simple Waypoint Navigation
Steps:
- Unlock Chart (if on)
- Stop Navigation (if active)
- Move chart until your target is below the center (crosshair), use zoom if necessary
- LockMarker (start navigation)
- Lock Chart
Alternative steps:
- Tap on the chart or use the
 CenterAction button to bring up the
feature list
CenterAction button to bring up the
feature list - Tap "Goto" in the feature list dialog
Bearings
If a waypoint is active and the chart is not locked to the boat position you have a "Center" display at the left side. This shows the center position, the course and distance from the boat to the center and from the waypoint to the center. For a simple bearing just move the chart center (crosshair) to the bearing target and read the bearing from the "Center" display.
To start a route - change with ![]() to the route
editor.
to the route
editor.